How to Find the Right Tire Pressure
Tire pressure matters. And it may also be the most approachable yet neglected part of your motorcycle suspension. Full-on suspension tuning is a daunting and complex undertaking for all but the most passionate rider. But anyone can confidently adjust their tire pressure to match their riding style and road conditions.
Let’s first take a look at how tire pressure affects handling and safety, then how to determine the right tire pressure for the way you ride, and wrap-up with a few tips to keep those tires pumped up.
Tire Pressure and Ride Quality
Road racers, motocrossers, and even street riders use tire pressure to make small adjustments to their suspensions in an effort to fine tune handling characteristics for the particular riding conditions at hand. Even if one can’t detect a difference in rideability, making the right small changes will at least take some worry about tire grip off the table.
Actual air pressure in a tire at any given moment is a function of tire temperature. That is, as a tire warms up and cools down, air pressure correspondingly goes up and down. Consequently, any discussion of one must consider the other. MotoGP teams take this concept to the extreme. They invest significant time and effort to measure and maintain optimal settings to yield the best lap times on a given track and ambient air temperature combination. Most street riders can dial it back a bit, but still should understand this aspect of motorcycle performance.
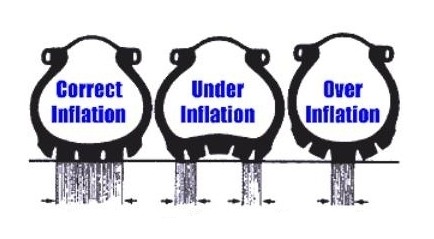
Tire inflation at the extremes, too high or too low, is noticeable to experienced riders and a good reason to stop for an adjustment. Too much tire pressure may make a bike feel more agile but also increases ride harshness and tire wear. Aggressive riders who really bring up tire temps may find their tires go from grippy to slippery.
On the other hand, too little air pressure leads to sluggish handling causing the bike to feel like it wants to wander. In contrast to over inflated tires, under inflated tires may grip better on unpaved roads and other low traction surfaces. Dirt riders for example tend to prefer the handling characteristics of softer tires.
Riding in the rain is another consideration. The siping grooves in underinflated tires are less effective in wet conditions increasing the danger of hydroplaning and losing contact with the road. (Unsolicited trivia – In 1923 John F. Sipe invented and patented the idea of cutting grooves in shoes for better traction, Goodyear made the idea work for tires.) And like over inflated tires, tires with too little air pressure also wear faster on the outer area of the contact patch rather than the center.
Start With The Motorcycle Manufacturer Recommendation
Indeed, finding and maintaining optimal tire pressures is an important part of getting the best from your motorcycle suspension. Performance, confident handling, fuel economy, tire wear, and most importantly rider safety all depend on having the right amount of air in the tires.
So what tire pressure is best for your motorcycle and the way you ride?
The right place to start is with the recommended tire pressures found in your owner’s manual and shown on a placard attached to the motorcycle frame. These recommendations always apply to cold tires.
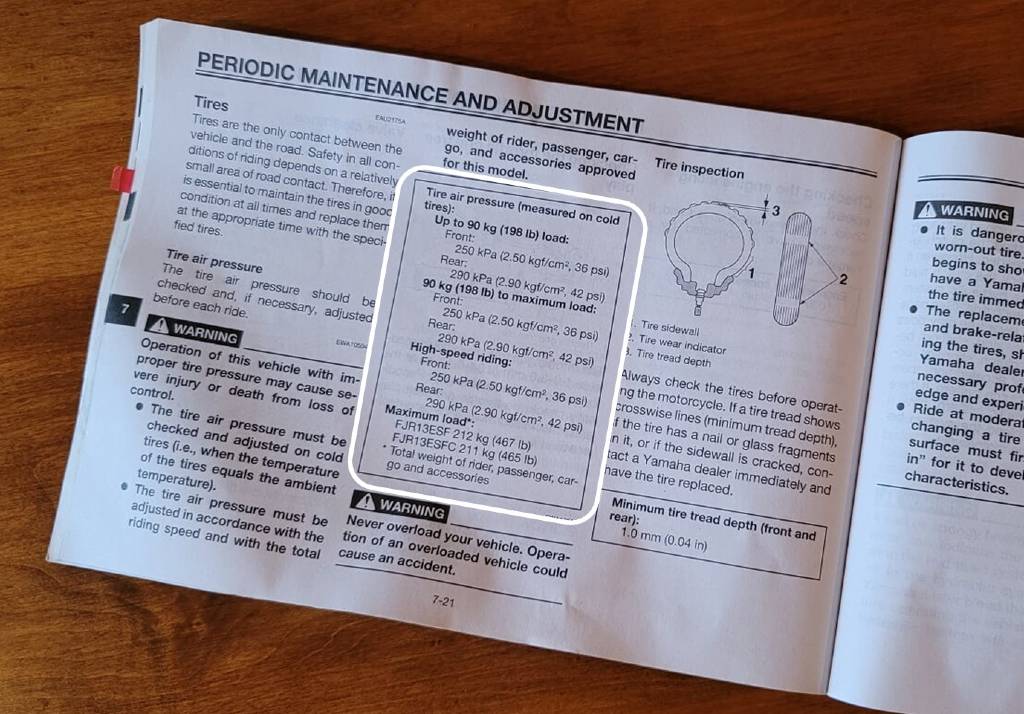
Some manufacturers give a single recommendation regardless of load, while others provide a second recommendation for two-up riding. For example, BMW recommends 42 PSI front and rear in all cases on the 789 pound BMW K1600GT. Yamaha on the other hand gives two recommendations for the 642 pound FJR; 36 front and rear when unloaded, and a bump-up to 42 PSI on the rear when riding two-up or with luggage.
You can see from these recommendations that motorcycle weight alone is not a particularly good guide to determine tire pressure settings. Factory engineers develop their recommendations with an understanding of the complete suspension package.
It’s natural to ask if the recommendation from the manufacturer is right for every rider and road. The short answer is almost always yes. These settings were found to yield the best performance, comfort, and tire wear in typical riding scenarios.
If however you conclude adjustments are needed after giving the factory settings a fair trial, consider the trade-offs carefully before making changes and for your safety be sure to stay under the max PSI specified for the tire itself.
Understanding the Tire Maker Max PSI
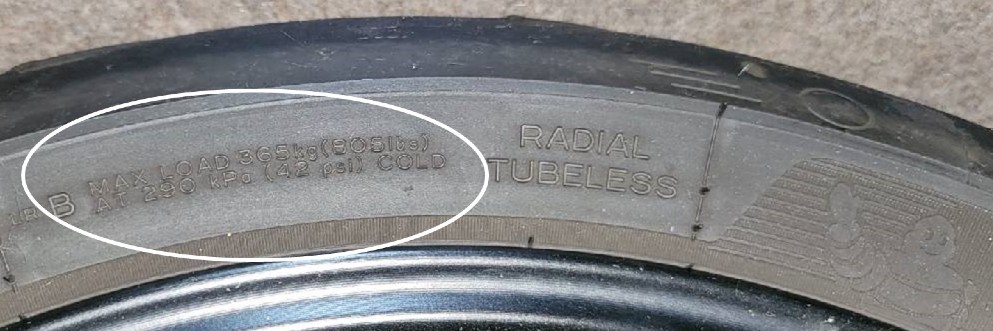
Let’s take a short detour at this point to explain tire maker max PSI and what it means to you. The max PSI value for any tire can be found on the tire sidewall. This is not the recommended tire pressure to use for your motorcycle or any motorcycle for that matter. Instead, the value represents the maximum cold tire pressure that the tire can safely handle regardless of motorcycle, load, or riding style. If you are running tires designed for your motorcycle this value is always at or above the motorcycle maker’s recommended tire pressure, so not a problem. If somehow the recommended tire pressure for your motorcycle is greater than the max PSI specified on the tire itself you have the wrong tires. Don’t exceed the max PSI specified by the tire maker.
Finding the Right Tire Pressure For How You Ride
Let’s come back to finding the optimal tire pressure for you. A singular factor when deciding how much air to put in your tires, if you deviate from the manufacturer recommendation, is to consider how and where you ride. Fast riders on well paved roads may want a little more air to increase stability at speed and improve handling. Riders who find themselves on low traction surfaces may elect to take a little air off. But for virtually everyone else factory settings are still the best option.
Determining the right setting for any combination of motorcycle, tire, road surface, and riding style requires some experimentation. A popular approach is what’s referred to as the 10/20 rule which simply says the difference between front and rear cold and warmed tire pressure should be 10% and 20% respectively. Here’s how to use it.
Start by setting cold tire pressures to the factory recommended setting. Then warm-up the tires by taking a 20- or 30-minute ride on roads that are typical for you. Now measure the warmed-up tire pressures. If the warm tire pressure is less than 10% higher at the front and 20% higher at the rear, then let the tires cool down (which can take 2 to 3 hours) and release a little pressure. Slightly lower tire inflation allows additional flexing and generates more heat. Measure and make a note of the new lower cold tire pressure setting. Repeat the warm-up and re-measure until warmed-up front and rear tire pressures are within 10% and 20% of cold pressures. Your last cold tire pressure measurement is the optimal tire pressure for your motorcycle and your riding style.
Here’s an example using a typical front tire…
| Do This… | Front Tire Reading… | Means… |
|---|---|---|
| Starting by measuring and recording cold tire pressure | 36 PSI | The tire is at the recommended level |
| Ride 20 or 30 minutes to warm the tires | — | Tires are warm up to typical levels for your riding style |
| Measure and record warm tire pressure | 38 PSI | Less than a 10% increase means the tire is not generating enough friction to fully warm-up |
| Allow the tires cool (for about 2 or 3 hours ) then bleed off a small amount of pressure and re-measure | 35 PSI | This lower pressure will let the tire generate more heat and therefore more pressure; make a note of the new cold tire setting |
| Take another warm-up ride and another warm tire pressure measurement | 38.5 PSI | Done! Warmed up pressure is now about 10% higher than cold; use the last cold measurement (35 PSI) as your target cold tire pressure |
Check and Adjust Tire Pressure Often
Tires naturally leak a little air over time, consequently it’s important to regularly check and top up the air as needed. For riders who ride frequently a check every other week is about right. For long distance touring riders, check before setting out and then periodically along the tour. The important thing is to get in the habit of regularly checking tire pressure.
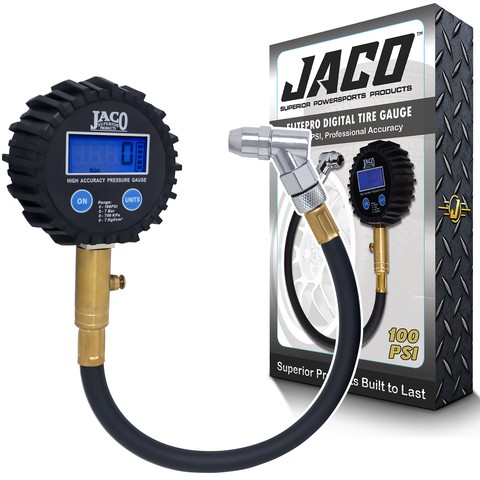
A reliable tire gauge is a must-have in every tool kit. There are any number to choose from featuring all sorts of designs. A gauge with a flexible air hose and a built-in bleeder valve is the easiest to use. The flex hose makes squeezing between brake rotors and rims to reach the valve stem much easier, particularly on the front wheel.
Use a Quality Tire Gauge
We looked at a number of tire gauges and found gauges from JACO are well made and a great value. JACO earned their place as the #1 selling brand worldwide by using high quality materials, calibrating each gauge at their in-house facility, and adding unique features like glow in the dark scales for low-light use, swivel connectors, and proprietary HybridFlex hosing. Prices are reasonable too, with models ranging from $20 all the way up to $40, all with a lifetime warranty.
Read more about choosing a tire gauge in the article How to Pick the Right Tire Gauge.
How to Check and Set Tire Pressure
Make sure the tire is cold, meaning it has been standing for 2 to 3 hours, before checking pressure. Add air as needed to bring the level up to the manufacturer recommendation or to the setting that works best for you. Bleed off a little if a cold tire is over filled; (don’t bleed air from a warm tire as the result may be an underinflated tire).
Its good practice to also inspect the tires for any external damage such as scrapes, cuts and gouges, or bubbled areas.
If you find a tire is consistently under-inflated it’s a good idea to have a tire shop take a closer look. There may be unseen damage to the tire or wheel.
Get the Most From Every Ride
Motorcycling comes with risks; some are beyond a rider’s control. But risks caused by over or underinflated tires are something every rider can minimize while maximizing performance and tire life.
Take the time to find the right tire pressure for you, carry a quality tire gauge, and monitor and adjust pressures regularly. Getting in the habit of checking and adjusting tire pressure is the easiest way to ensure you get the best performance and handling your motorcycle can deliver.
[placeholder text]
Your response is used by American Sport Touring only, we do not store or sell your information.
Please read our Privacy Policy.

by John DeVitis, Editor and Publisher
John DeVitis, Editor & Publisher of American Sport Touring, has spent years riding and writing with a focus on long-distance, performance-oriented motorcycling. His time on the road has revealed little-known routes across the United States and Canada, along with practical insights into the bikes, gear, and techniques that matter to sport touring riders. He draws on this experience, together with a background in digital publishing, to guide the editorial principles and clear vision behind American Sport Touring, delivering content riders can trust.
References & Resources
Useful Links
| Site | Link |
|---|---|
| Michelin motorcycle tire basics | https://www.michelin-training.net/courses/motorcycle_tire_basics/english/ipad/index.html |
| Dunlop motorcycle tires Care & Maintenance | https://www.dunlopmotorcycletires.com/about/care/ |
| Pirelli on the technology behind motorcycle tires | https://www.pirelli.com/tires/en-us/motorcycle/all-about-tires/all-about-tires |
| Bridgestone guide to proper motorcycle tire inflation | https://www.bridgestonemotorcycletires.com/en-us/tips-and-support/bridgestones-guide-for-proper-inflation-of-motorcycle-tires |

