Five Secrets for Basecamp Success
Planning the route for a sport touring ride is often as much fun as the ride itself. Garmin’s BaseCamp desktop application, combined with high-quality Garmin maps, can make the task easier and more fun – if you know how to use it.
Editor’s Note: We reached out to Garmin for comment on the future of BaseCamp and were told in reply, “We are moving away from Basecamp and we are focusing on the Tread app for route planning and data management.” Garmin did not say when or if they will discontinue support for BaseCamp. For now, we continue to believe BaseCamp is a superior route planning product and recommend it.
Garmin released BaseCamp in 2008 giving users a powerful tool for planning, managing, and transferring GPS data between their computer and Garmin device. While Garmin has earned a strong reputation in mapping and navigation, BaseCamp remains a perennial source of frustration for sport touring motorcyclists everywhere. The five secrets revealed here will unlock the power of BaseCamp and kickstart a deeper understanding of its many powerful, though sometimes clumsy, features.
Five Secrets to BaseCamp Success
Let’s take a look at the five secrets for BaseCamp success and then walk through an example to bring it all together. Keep in mind this is not intended as a tutorial, but rather to reveal the ‘aha’ moments that demystify BaseCamp.
Secret #1: BaseCamp Needs a Connected GPS
Garmin developed BaseCamp to add value to GPS products like the Zumo XT. Although BaseCamp is free to download, it is not very useful without a connected Garmin device.
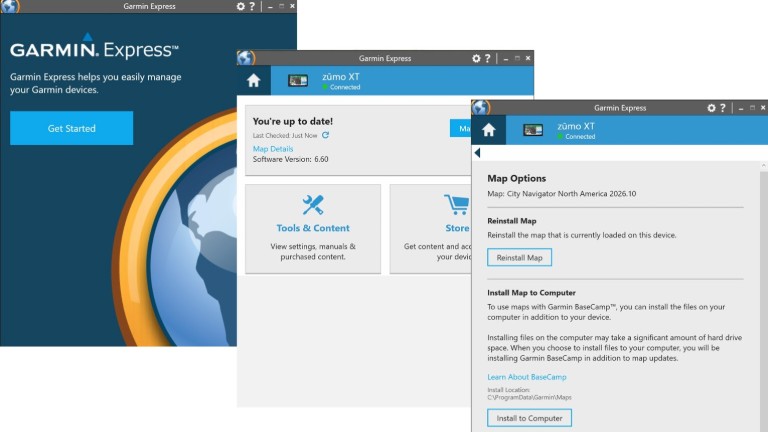
For best results, install compatible Garmin maps on your computer rather than relying on the device connection alone, because BaseCamp generally performs better when the maps are installed locally. Installing compatible Garmin maps on your computer is typically done through Garmin Express, a separate free download. Launch Express and connect your GPS. Then select the connected device and apply any available map or software updates. Next click Map Details to open a window that allows you to install maps on your computer. Note that maps consume somewhere between 3 and 4 gigabytes of disk storage. If space is not available the process simply fails with no explanation. If that happens, check available disk space and try again.
A compatible Garmin GPS may be required to install licensed Garmin maps to your computer before BaseCamp can display detailed maps and create routes.
Secret #2: BaseCamp’s User Interface is Primitive but Works
Garmin won’t win awards for the BaseCamp user experience, but there is logic to its design, and once understood, it is entirely workable. The secret lies in understanding how tasks, such as panning the map or inserting waypoints, are performed in BaseCamp.
To perform any activity users must first select the desired task from the menu or toolbar. Until a new task is selected, the mouse and application behave according to the active task. For example, if the Pan tool is active, the user can drag the map by clicking on it. But if the active task is New Waypoint, clicking the mouse on the map inserts a waypoint. While not a modern UI design, this paradigm remains consistent throughout the app.
After completing one task, always select the next task from the toolbar or menu.
Secret #3: Lists Contain Routing Waypoints
Think of the information needed to create a route as a list of waypoints, each with its own descriptive properties. For example, a waypoint might describe the Silver Legacy in Reno, Nevada with a name, address, and geo-coordinates. Similarly, via points can be created to shape a route, but unlike waypoints, they are not highlighted with a flag icon on the map. BaseCamp routes are constructed from a list of waypoints and then stored with the waypoints in the same list.
All routes are created from waypoints contained in a BaseCamp list.
Secret #4: More Waypoints Lead to Predictable Routes
A GPS route is simply an organized list of waypoints and via points representing specific locations the route must pass through. Each GPS device runs that list through its own algorithm, taking into account settings such as avoidance areas and route preferences, resulting in turn-by-turn directions. Because routes are created on separate devices, one GPS may show a different route than another. Consequently, the more waypoints and via points in the list the better the odds that everyone will have the very same route.
Adding more waypoints and via points to the route list, and matching GPS avoidance and route preferences, increases the likelihood that all devices will generate the same route.
Secret #5: Find a Quality Tutorial
Anyone who has attempted to use BaseCamp has probably sought help from a tutorial. Searching the web turns up what seems like an infinite list of YouTube videos all claiming to get you started quickly. After wading through many of them, we came upon a 26-part video series produced by EZ Moto Tim.
These short, accurate, and easy-to-follow videos will help you start creating routes in no time. If you are new to BaseCamp, watch video 4, General Set-up, through 8, Adding Waypoints, to learn everything needed to master routing with BaseCamp.
Watch BaseCamp tutorials from EZ Moto Tim to build routing skills that will turn you into a route planning wizard.
Putting It All Together
Let’s illustrate how these concepts come together by creating a ride using BaseCamp. After working through a few simple ride plans, learning to use more BaseCamp features will seem far less daunting.
The Ride Scenario
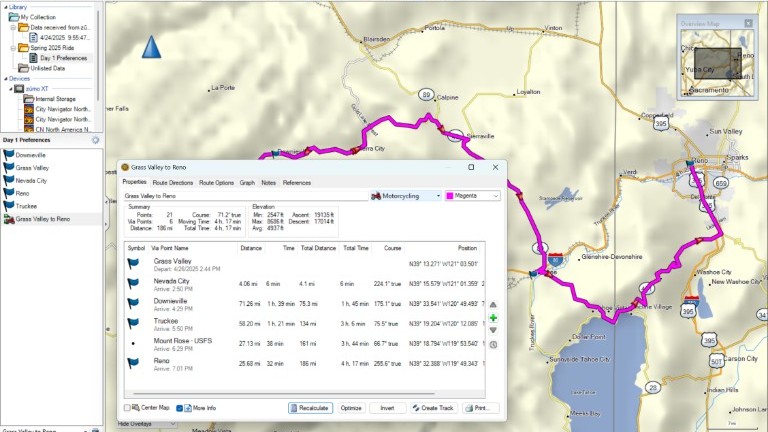
Here’s the simple example scenario: A group of riders has decided to explore roads between Grass Valley California and Reno Nevada on the first day of a multi-day journey. After some discussion, they agreed on the following outline:
- Meet up in Grass Valley, California.
- Pass through Nevada City.
- Ride California SR 49 through the Sierras.
- Visit the historic town of Downieville.
- Follow California SR 89 to Truckee.
- Visit the small shops on Truckee’s main street.
- Ride on to Reno to wrap up the day.
Start BaseCamp
The first step, of course, is to install BaseCamp along with a routable map on your desktop PC.
Installing BaseCamp is straightforward using the download link on Garmin’s website. Once installed, start the application and make two configuration changes using the Options submenu found under the Edit menu. First, set your activity to Motorcycling to encourage BaseCamp to prefer curvy roads over highways. Then uncheck all avoidances except unpaved roads.
Next, connect your Garmin GPS to your computer and use Garmin Express to copy maps from the device onto your desktop. After installing the maps, return to BaseCamp and set the active map product to City Navigator using the Map Products toolbar option. BaseCamp can now create routes using the City Navigator map copied from your device.
Create a List of Waypoints
Now let’s add the agreed waypoints to a BaseCamp list. First, create a folder to contain route lists for this ride: right-click on the My Collection folder, select New List Folder from the context menu, and assign it a name like ‘Spring 2025 Ride”. To create the waypoint list, right-click on the ride folder, select New List, and name it “Day 1 Preferences”.
To add waypoints, first select the “Day 1 Preferences” list. The waypoints for the selected list will appear in the lower pane on the left side of the screen as they are added.
Use the Pan toolbar icon, or the Search Bar in the upper right, to center the map on Grass Valley, California.
BaseCamp does not account for temporary road closures due to construction or weather, making it a useful tool for year-round route planning. However, riders should always check current road conditions before setting out.
To add Grass Valley to the waypoints list, first click the New Waypoint toolbar icon and then click the city name or a road in Grass Valley on the map. The new waypoint, denoted by a flag icon, appears in the Day 1 Preferences list and a dialog box opens on the map. Click the link in the dialog box (or double-click the waypoint in the list) to give the entry a meaningful name if needed.
Repeat these steps for each additional waypoint. To pan the map, remember to click the Pan icon or use either the blue navigation arrow in the upper left or the Map Overview window. The New Waypoint task remains active until you select another tool.
Create and Shape the Route
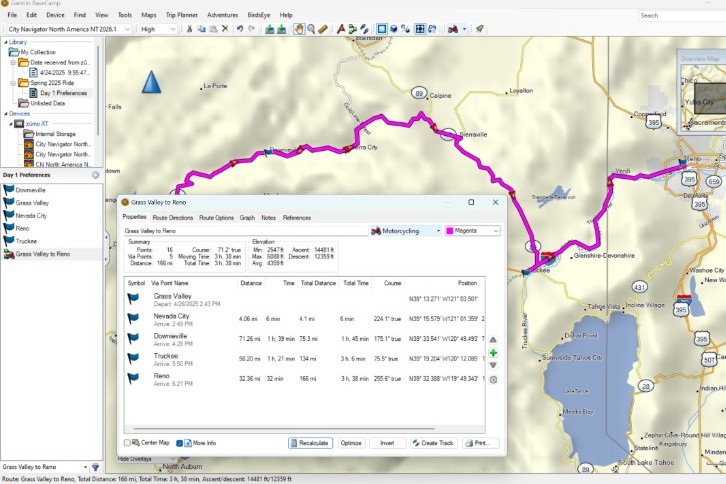
With waypoints entered, we are ready to create a route. The easiest way to do this is to select all waypoints in the Day 1 Preferences list, right-click, and choose Create Route Using Selected Waypoints. BaseCamp then creates a route through each waypoint and adds the route to the Day 1 Preferences list. Double-click on the new route name to view, reorder, or insert new waypoints, recalculate the route, and view summary information.
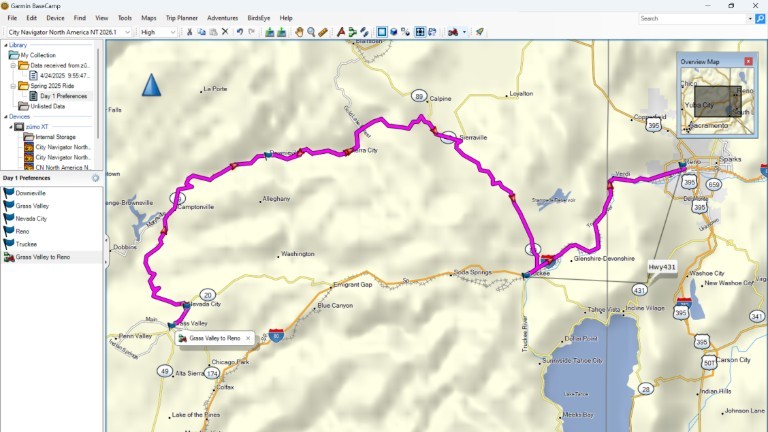
BaseCamp can also create route variations using some or all of the waypoints in the Day 1 Preferences list. This is a handy way to experiment with different route sequences and waypoints. While reviewing the route in our example, we noticed BaseCamp routed us around the Mount Rose Highway between Incline Village and Reno. That’s a fun road, so we added a via point with the Insert tool to ensure it’s included in the route.
Export and Share the Route
With the Day 1 Route in good shape, we are ready to share it with our riding group. To do this, first save the route as a GPX file using the Export option under the File menu, and then send it to the group. Group members can view the route with their preferred map software, and copy the GPX file to a GPS device.
A note of caution: since the GPX file is not a static route but rather a list of coordinates, each GPS device may compute a slightly different path. To address this concern, add waypoints and via points at key intersections to make it more likely that all GPS routes will match.
That’s it! Day 1 of the journey is ready to ride.
Final Thoughts
Route planning is a lot more fun with good software and much easier with the help of a large desktop screen and keyboard. And while BaseCamp has a rightly earned reputation for causing user frustration, it is nevertheless a widely used and powerful route planning tool.
Yes, the learning curve is long and steep, but learning how to create basic routes with BaseCamp is something anyone can pick up. Take it one step at a time, be patient, and most of all don’t give up.
Share Your Thoughts
Thank you for your feedback!
Please email the editor with any additional comments.
Your feedback is used only by American Sport Touring. We do not store or sell your information.
Please read our Privacy Policy.
Resources
| Topic | Link |
|---|---|
| Garmin BaseCamp download page | https://www.garmin.com/en-US/software/basecamp/ |
| Garmin Express download page | https://www.garmin.com/en-US/software/express/ |
| EZ Moto Tim BaseCamp tutorials | https://ezmototim.com/basecampvideos/ |

by John DeVitis, Editor and Publisher
John DeVitis, Editor & Publisher of American Sport Touring, has spent years riding and writing with a focus on long-distance, performance-oriented motorcycling. His time on the road has revealed little-known routes across the United States and Canada, along with practical insights into the bikes, gear, and techniques that matter to sport touring riders. He draws on this experience, together with a background in digital publishing, to guide the editorial principles and clear vision behind American Sport Touring, delivering content riders can trust.