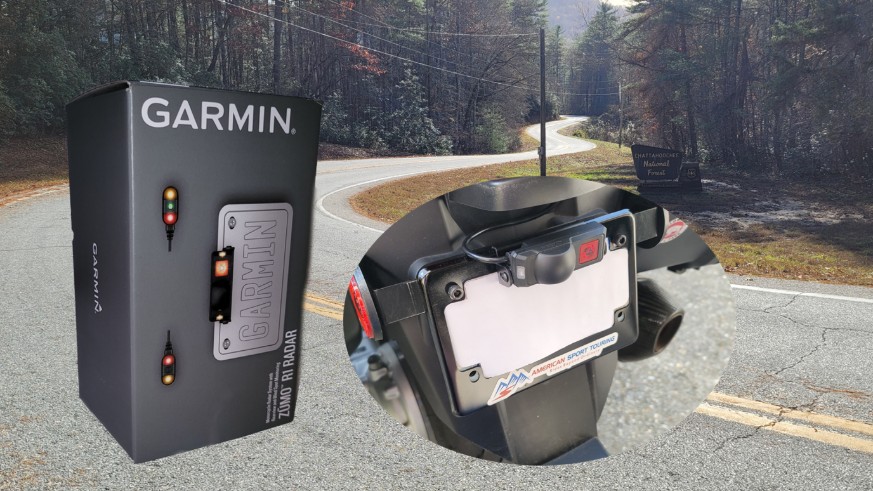
Garmin R1 Radar for Motorcycles: First Look
City riding is often dreaded by motorcycle riders—it can feel like navigating a combat zone. Vehicles approach from every direction, increasing risk levels and testing even the most alert riders. At times, it seems like every car is out to get you. This is not how a sport touring motorcycle ride should be. We need more tools to improve our odds, and Garmin stepped up with a first of its kind radar system for motorcycles.
As all riders know, situational awareness is paramount when sharing the road. Information about the location of approaching vehicles, especially those that may be in your blind spot, can allow you to ride with more confidence.
— Dan Bartel, Garmin Vice President of Global Consumer Sales
Garmin, long recognized as a leader in aviation and marine radar, now brings that same expertise to the motorcycle world. At the 2025 Consumer Electronics Show, the company announced the zūmo R1 Radar, the first radar system designed specifically for motorcycles. The R1 combines a rear-facing radar unit with grip-mounted visual indicators to increase situational awareness and reduce blind spot surprises.
We got our hands on the product and put it to the test. Here’s what we found.
How Garmin R1 Radar Works
The R1 Radar system consists of a rear-facing radar unit connected via a wiring harness to indicator lights mounted on the rider’s left and right. Let’s take a closer look at each component.
At the heart of the system, a rear-facing radar unit does the heavy lifting. It mounts on the license plate frame using an included metal bracket (you supply the nuts and bolts). The radar picks up approaching vehicles within a 170-degree arc behind the motorcycle and up to 200 feet away. In addition to sending signals to the indicator lights up front, the radar unit itself has built-in lights that alert approaching drivers when they are in your blind spot and to help them see you a bit better should they rapidly catch up with your motorcycle.
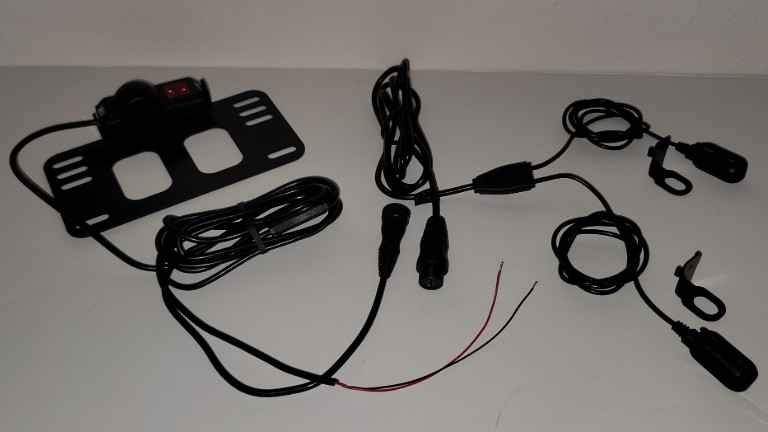
The forward indicator units light up when vehicles are in the rider’s blind spot and when a vehicle approaches rapidly or is considered a threat. Indicator units can be mounted on the handlebars near the grips or on the mirror mounts using the supplied brackets. The important thing being that they are easily seen before changing lanes or making a turn.
The R1 was designed to work with a paired zūmo XT2 navigator and the zūmo Radar smartphone app. While the R1 can operate standalone, it’s clear that this product works best in tandem with an XT2 or smartphone app. Without either one, riders are left to rely on indicator lights alone – no blind spot audio alerts and no screen representation of surrounding traffic. In addition, the app provides the only practical way to modify radar unit configuration settings and install firmware updates.
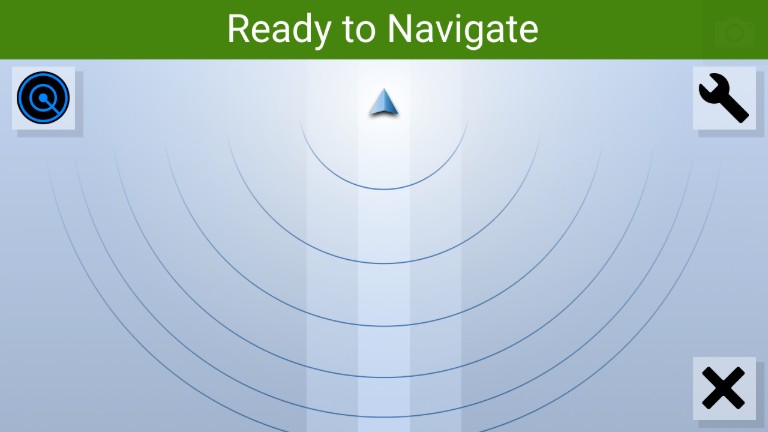
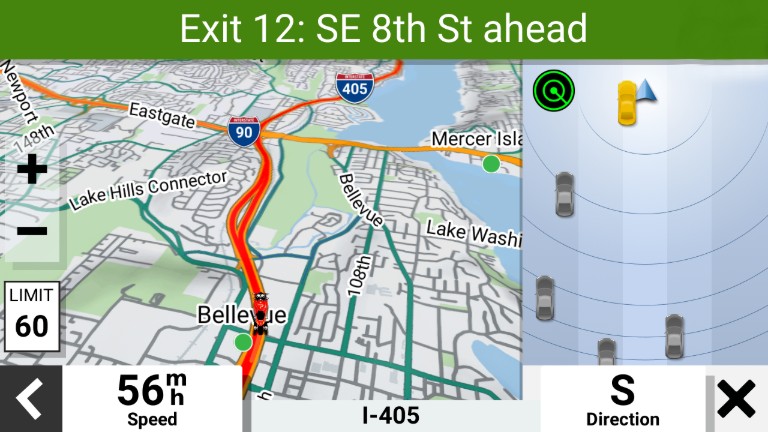
Both the XT2 and smartphone app provide a visual representation of surrounding traffic, with an option to add virtual lane alignment markers (Garmin refers to these simply as alignment lines). The radar unit simultaneously detects up to 8 vehicles, each shown on the XT2 or smartphone screen in one of three colors to represent their perceived threat level: yellow if a vehicle is in your blind spot, red when vehicles approach rapidly, and gray when approaching from up to 200 feet away. The R1 will not detect vehicles beyond 200 feet or those outside the radar’s 170-degree field of view.
Feature Highlights
- Radar becomes active at speeds between 15 and 93 MPH.
- Tracks up to 8 vehicles simultaneously.
- Detects vehicles up to 200 feet away.
- Scans a 170-degree field of view behind the motorcycle.
- Triggers alerts when vehicles enter the rider’s blind spot or close on the motorcycle at between 0 and 34 MPH.
- Configurable rear-facing lights in the radar unit alert drivers when they are in a blind spot and when they approach rapidly.
- Sends audible alerts to a headset when paired with the XT2 or a smartphone.
- Electronic components are constructed from impact-resistant ABS plastic and earned an IP67 dust and waterproof rating.
- Mounting brackets are powder-coated stamped steel.
- Available now on Garmin’s website for $599.99.
Installation
Garmin includes everything needed for a professional-looking installation, including mounting options that are sure to fit any motorcycle, and plenty of zip ties for neat cable routing.
Installation was straightforward and took less than an afternoon. Only modest mechanical skills are needed; if you can locate a power source on your motorcycle and connect positive and negative leads, you have what it takes. Neatly and safely routing wiring cables from one end of the motorcycle to the other was the most challenging step.
Three components must be installed: the license plate mounting bracket, the rear-facing radar unit, and the handlebar or mirror-mounted indicator lights. The radar unit and indicator units are fixed to their respective wiring harnesses making it difficult to pass cables under fairings and around frame components.
We started by laying out the components on our test bike to determine the best cable paths and power source. Cable lengths are long enough to get around fixed obstacles like frame components and fairing clips. The radar unit cable measures 5 feet, while the indicator cable provides just over 7 feet of length, more than enough to reach both the left and right indicator units. The power cable extends 3 feet from the radar unit wiring harness.
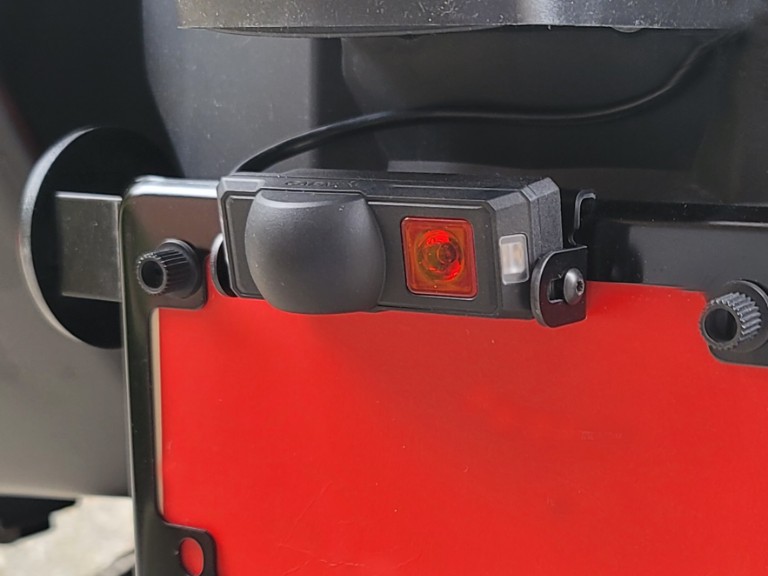
After planning the cable runs, we installed the radar mounting bracket behind the license plate using metal bolts and attached the radar unit to the bracket with the provided 4mm screws. We decided to route the cable from the radar unit around the tail rack and under the seat using clips along the exterior of the fairing. Every other alternative path would require cutting a hole through the fairing.
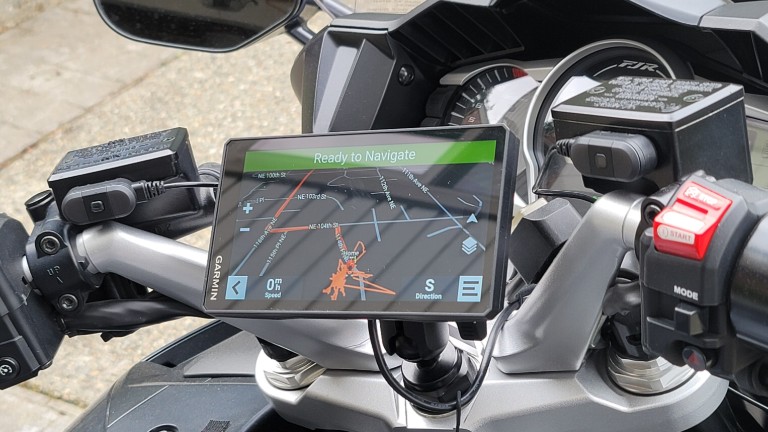
Next, we installed the left and right indicator units. Garmin offers several mounting options. For our FJR, we used glue pads to attach the indicators to the clutch and brake reservoirs. This proved to be the best option to keep the indicators in view with the mirrors. Finally, we routed the indicator cables behind the fairing and connected the indicator and radar unit cables under the seat.
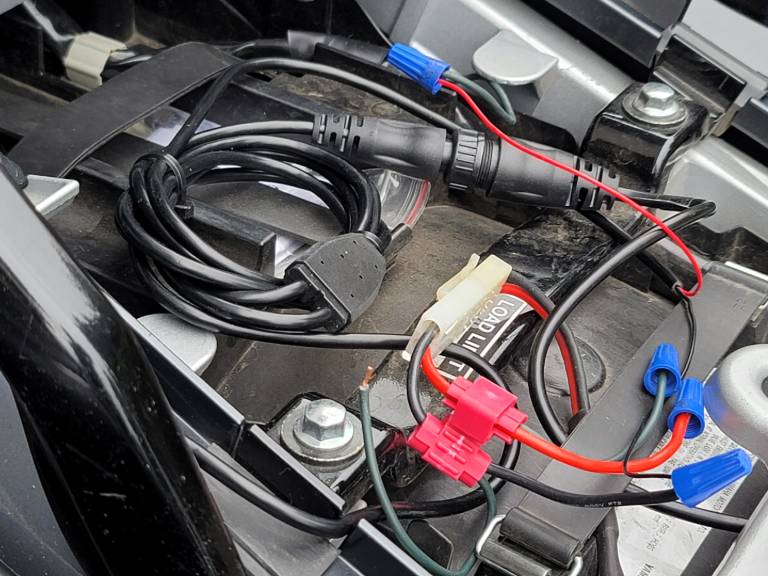
The last step was to connect the radar system to a power source. This can be done in either of two ways. The simplest approach is directly connecting with the battery power using the provided cables. Taking this approach means using the power button on the left indicator to turn the radar unit on and off before and after each ride. A more convenient option is taping a switched power wire (for example the one to the taillight) ensuring the radar unit powers up and down when the ignition switch is turned. We chose this option.
Configuring Devices
Garmin says the R1 can be used without a paired smartphone or XT2—and while that’s technically true, the experience is far better with visual feedback.
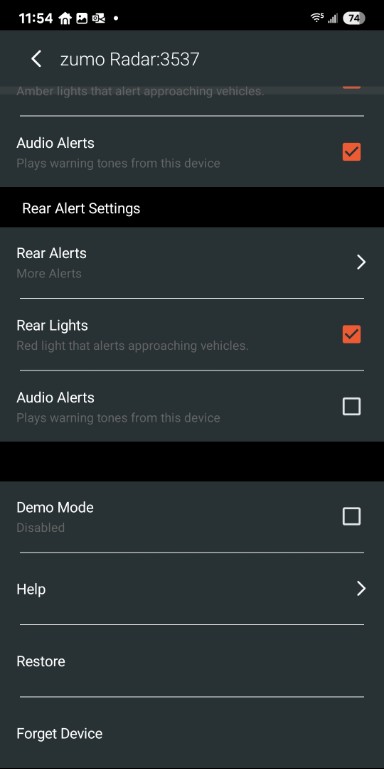
Start by downloading and opening the free Garmin zūmo Radar app. Create a Garmin account and then browse configuration options for the app and radar unit; (the R1 must be powered on and paired with your smartphone to view its settings). Options are available to enable or disable rear alert lights, customize blind spot alerts, and adjust radar sensitivity. The radar sensitivity setting is worth experimenting with to find the level that’s right for your riding environment.
The R1 integrates seamlessly with a zūmo XT2. When paired, the XT2 displays a radar button on the map screen that opens a side panel containing the radar view. Tap the side panel to open it in full screen mode. The XT2 allows you to turn on and off lane alignment markers but does not provide access to radar configuration settings. You need the app for that.
The Test Ride
With the system fully installed and configured, it was time to hit the road. The R1 powered up with the ignition, performed a quick self-test, and then immediately paired with both my smartphone and the XT2 mounted above the steering head nut. The XT2 provided visual input and audio alerts were directed to a Cardo Packtalk headset.
The first miles were on a quiet road—not a single car in front or behind. The XT2 radar screen showed a single arrow at the center of the virtual lane alignment markers and nothing else. Eventually, the radar detected an approaching car and it appeared on the XT2 and began moving from the bottom of the display toward the arrow representing my motorcycle. Had that car approached quickly the R1 would alert me by flashing red indicator lights.
Turning onto the main road, a typically congested four-lane affair, the R1 came alive. Indicator units reliably flashed yellow and an audio alert sounded when vehicles entered my left or right blind spots. Occasionally, particularly when stopping quickly at an intersection, the red indicator lights flashed to warn of an approaching vehicle which in reality was the driver behind me coming to a slightly slower stop.
When the bike is stopped (or slows below 15mph), the R1 becomes inactive and any detected vehicles shown on the XT2 screen disappear.
The blind spot warning indicators near the grips are especially useful on the highway where a rider is minding traffic on all sides. The visual representation on the XT2, however, becomes overly busy with as many as 8 vehicles moving around the screen. For highway riding we found it less distracting to turn off blind spot audio alerts and rely solely on the indicator lights, but keep audio alerts enabled for rapidly approaching vehicles.
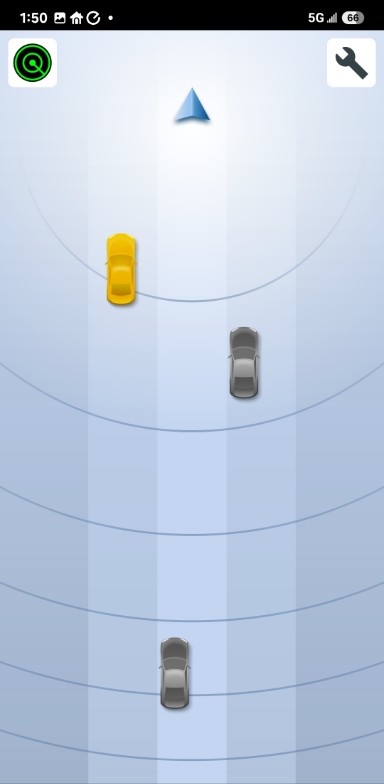
The XT2 visuals are a nice-to-have feature, as are the rear-facing warning lights. But in terms of rider aids and safety, the blind spot warning lights proved to be the most useful feature and a worthwhile safety enhancement.
While it is tempting to rely on blind spot indicators, I still looked left or right before changing lanes. After all, the radar only has a 170-degree field of view starting from the very back of the motorcycle.
What We Liked
- Solid construction: the radar and indicator units are housed in impact-resistant ABS plastic, with sealed, waterproof connectors.
- Wiring is simple; only a positive and negative lead to connect to your motorcycle battery.
- Radar detection is accurate, and alerts are highly responsive to traffic.
- Paired with an XT2 or the zumo Radar mobile app, the R1 displays real-time vehicle locations and threat levels using color-coded markers.
What Could Be Better
- Installing the wiring cables would be much easier if the radar and indicator units were detachable allowing them to pass through small openings.
- The radar only functions above 15 mph, so it will not raise an alert if a vehicle approaches rapidly at a stop light. An alert in this situation could help riders avoid being rear-ended – a frequent cause of injury.
The Bottom Line
The R1 Radar is a useful rider aid that adds an extra measure of safety, especially in urban environments. It is easy to install and even easier to configure. Once fully set up and connected to switched power, it starts with the ignition and pairs quickly with your devices.
It takes time to get comfortable with the indicators and alerts. They can be distracting, and even a bit confusing, at first. But after a few rides, they become a valuable layer of situational awareness.
Is that worth the $599.99 price tag? Our answer is a qualified yes. If you ride backroads with little surrounding traffic, then the R1 will have fewer occasions to demonstrate its value. But sport touring motorcycle riders often find themselves on congested multi-lane roads between destinations and that’s when the R1 really shines.
Garmin R1 Radar adds an extra layer of awareness, especially in fast-moving traffic, low visibility, or when quick decisions are needed.
[placeholder text]
Your response is used by American Sport Touring only, we do not store or sell your information.
Please read our Privacy Policy.

by John DeVitis, Editor and Publisher
John DeVitis, Editor & Publisher of American Sport Touring, has spent years riding and writing with a focus on long-distance, performance-oriented motorcycling. His time on the road has revealed little-known routes across the United States and Canada, along with practical insights into the bikes, gear, and techniques that matter to sport touring riders. He draws on this experience, together with a background in digital publishing, to guide the editorial principles and clear vision behind American Sport Touring, delivering content riders can trust.


